Each Item Record in Artisan requires a preferred vendor. This can be the same or different from your manufacturer.
You can create vendors a few different ways:
1. In the Item Record, click on the Preferred Vendor dropdown and select “Edit,” then “Add.“


2. Click “Vendors” from the tool bar and click “Add a New Record” (or access the “Vendor” screen under “Inventory” from the “Main Menu“).


Regardless, you’ll be sent to the new vendor record screen.

Most of the fields in the vendor record are self-explanatory. It is always beneficial to fill in as much information as you have about the vendor. It will give you one place of reference and the necessary information will show on purchase orders.
Basic Info Tab
1. The first field is the vendor code. The vendor code is a unique abbreviation for your vendor. Usually, this code is shorter than the vendor name, so it will be easier to type, but some like to make it the same name as the vendor, so it is easier to remember.
If you are using automatically generated codes, your vendor code field will automatically say <<AUTO>>. See Numbering Schemes for more details. The Vendor Code is generated when the record is saved. If you do not like the code that is generated, you can edit the record and change the code.
2. The Main Category field, at the bottom left, is used if most of the items from this vendor fall into a specific category. When you create new inventory items and specify the vendor, the category will be set to the category you specify here. If the items from this vendor fall into a number of different categories, then leave it set to “(none)”.
3. The Vendor Type field helps you classify different types of vendors. You can filter vendor records based on this field in the vendor Power Search.
4. If this vendor has a tax number, you can insert it here.
Shipping Tab
Enter the vendor’s shipping information here.

Pricing & Consignment Tab

If you apply a pricing scheme to this vendor, select it here. Otherwise, leave it at “(none).”
If the vendor is a consignment vendor (ex. Artist), select “Yes.”
You can edit their consignment settings here, including if new items default to consignment, if the consignor gets a “split” of the sale or fixed amount, and the percentage of the split, if applicable.
You can also set a monthly rental fee for the consignor and if the consignor pays any credit card fees when customers purchase their products.
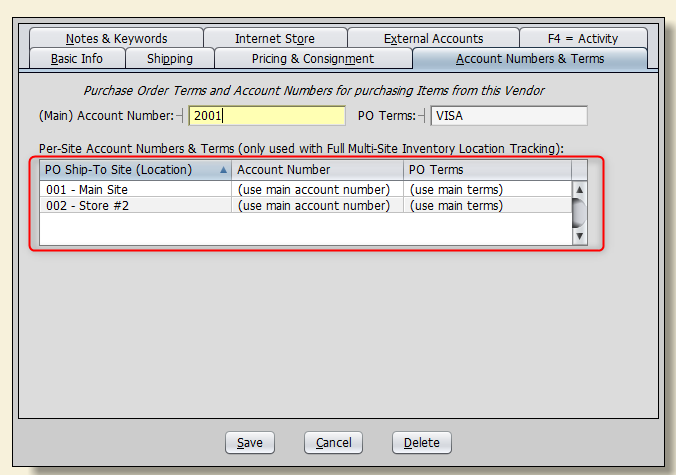
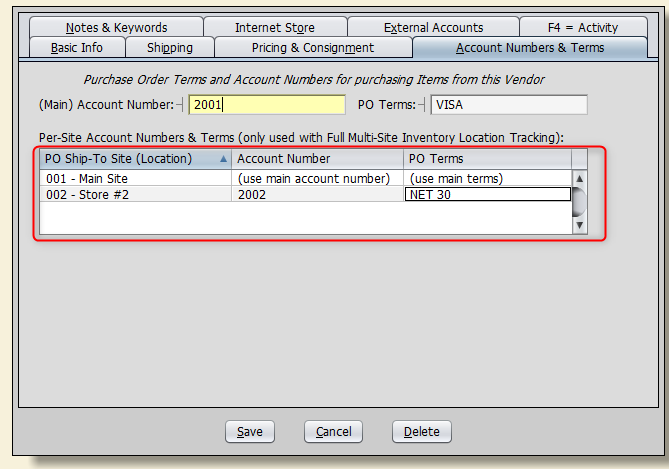
Account Numbers & Terms Tab
You can specify account numbers and PO terms per-site. “Multi-Site Inventory Tracking” must be turned on in your “Optional Features.” You can have your sites use the main account numbers and PO terms or set their own from this screen.
Notes & Keywords Tab
You can add any additional information about the vendor here, including pop-up notes, keywords, memos, and a prefix for UPC codes. The pop-up note will show as soon as you create a PO for this vendor. Memos and keywords do not show on POs. You can use keywords to group vendors to make them easier to find (ex. Power Search, Keyword).

Internet Store Tab
If you would like this vendor’s items included in your Internet Store, select “Yes.”

External Accounts Tab
Information from this tab is used when you export to QuickBooks. Read about External Accounting with QuickBooks for more information.

F4 = Activity Tab
Here, you can run Activity Reports to see any purchase orders for the vendor. You can also see a breakdown of the total amount sold from this vendor, units sold, and more.
