![]()
Welcome to Artisan POS QuickBooks Interface
Artisan POS has a very powerful and long-standing interface with QB Desktop and also with QB Online, or QBO, as it is often referred to via 3rd party apps such as Importer GURU. With recent big changes at Intuit, you may have some questions.
Support for QB Desktop from Intuit is changing, if not being discontinued altogether. Some of their services, such as QB Payroll, will be among the things most affected. It seems to us that Intuit is in the process of changing its business model to a monthly service. Here are some observations that we have made:
- New QB Desktop Licenses are based on an Annual Fee
- Intuit may offer support options for Existing QB Desktop Users
Here’s what CerTek’s stand is:
- The interface between Artisan POS and QB Desktop should continue to work fine in the foreseeable future.
- The LIMITED Interface between Artisan POS and QB Online via Importer GURU will continue to be supported until we release a new Artisan POS version that fully supports QBO.
- CerTek is working on a new QBO Interface, and we plan to fully support all the features of QB Desktop.
This article introduces you to connecting Artisan POS to QuickBooks DESKTOP and the LIMITED use with QBO via Importer GURU. We will walk you through setting up the program in Artisan and go over some common scenarios. You may skip to the following sections when you are ready.
All the information described in this document is designed for QB Desktop. The limitation for QBO via Importer GURU is that the export to Bills Due isn’t supported. This is critical if you are using Vendor Invoices or Consignment Payout. Please email us for more details on QB Online.
QuickBooks Overview
Artisan is designed to work in conjunction with QuickBooks or provide reports that you give to your accountant. Artisan does NOT have a full built-in accounting package, but it does handle many accounting functions. Here’s a breakdown.
Artisan POS Internal Accounting Manages
- Accounts Receivable
- Customer Store Credits
- Inventory Purchasing
- Inventory Value
- Vendor Invoices
- Cost of Goods Sold (COGS)
- Employee Time Sheets
- More
We rely on QuickBooks for
- General Expenses for Rent, Utilities, etc.
- Payroll
- Owner Equity
- Loans & Credit Card Debt
- More
We highly recommend that you use QuickBooks to help you keep track of these types of accounts. Artisan can send Sales, Money Receipts, COGS, Bills Due, Inventory Assets, etc. over to QuickBooks to assist you with what would otherwise be laborious data entry.
At the end of a day, Artisan will export out an .iif file that you can import into QuickBooks. This is an easy process and can be done daily, once a week, or any time interval you want. You can get started with QuickBooks as soon as you have your first day end or it can be delayed indefinitely.
You are expected to close out your sales daily. Then, when you are ready to get the first few weeks of data over into QuickBooks, you can specify the date range and Artisan will produce one file to import. This file breaks your sales into daily transactions summaries based on the accounts you have provided. We don’t send individual transactions into QuickBooks.
It takes about an hour to setup Artisan with your QuickBooks. The process starts by getting a chart of accounts from QuickBooks. We then copy the account information into certain fields in the Artisan Accounting Package Configuration screens.
Once you have completed those fields (at least for the ones you are using), then you can export out your first day end to QuickBooks.
Although we are NOT accountants and we may refer you to speak with yours, we can answer basic questions. When it comes to explaining double-entry bookkeeping, though, you are best to consult your accountant. For assistance with QuickBooks itself, our offerings are limited, and we may direct you to QuickBooks support.
Our experience and decisions are based on extended consultation with CPAs and bookkeepers. A big thanks to Lisa Lindsey, CPA who consulted on the initial development many years ago. Since then, we have consulted with numerous accountants over the years. From the beginning, it has been our goal to adopt generally accepted accounting practices and principles. Additionally, we have accumulated experience with end-users as well. We have also learned more about merchandising accounting with our partners in Retail Consulting and with the Management One group.
Get QuickBooks
You’ll need to purchase QuickBooks (or sign into your QuickBooks account if you already purchased it) in order to use the program with Artisan.
We recommend the desktop version of QuickBooks and not the online version, although the online version will work if you have the Importer Guru add-on. Guru Importer helps import .IIF files into QuickBooks Online. An IIF file is a file type that QuickBooks Desktop uses to export data, like transactions and lists.
Get Started
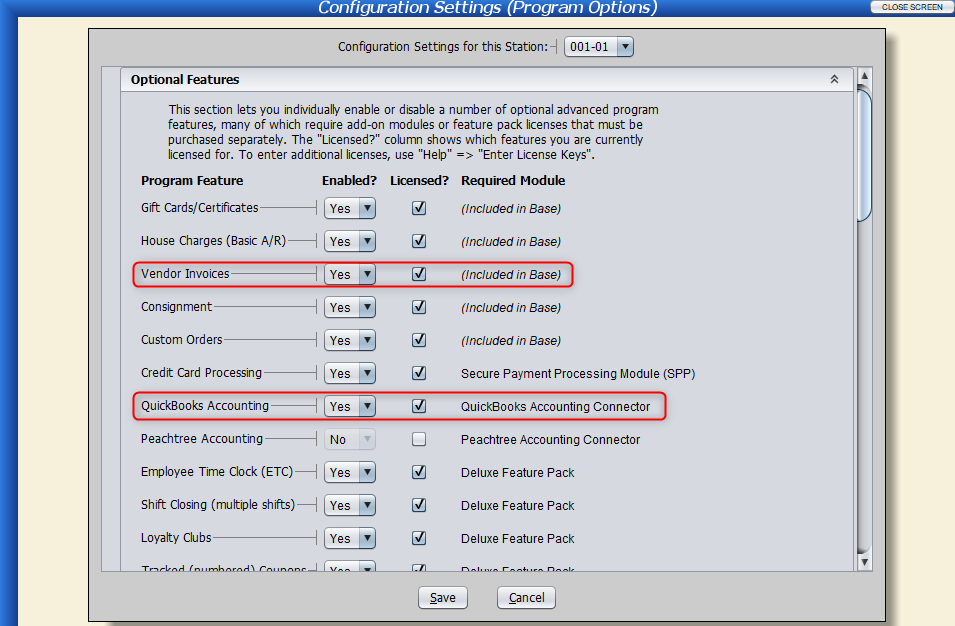
Turn on the “QuickBooks Accounting” feature. You’ll need to enter a license key for this feature if you haven’t already.
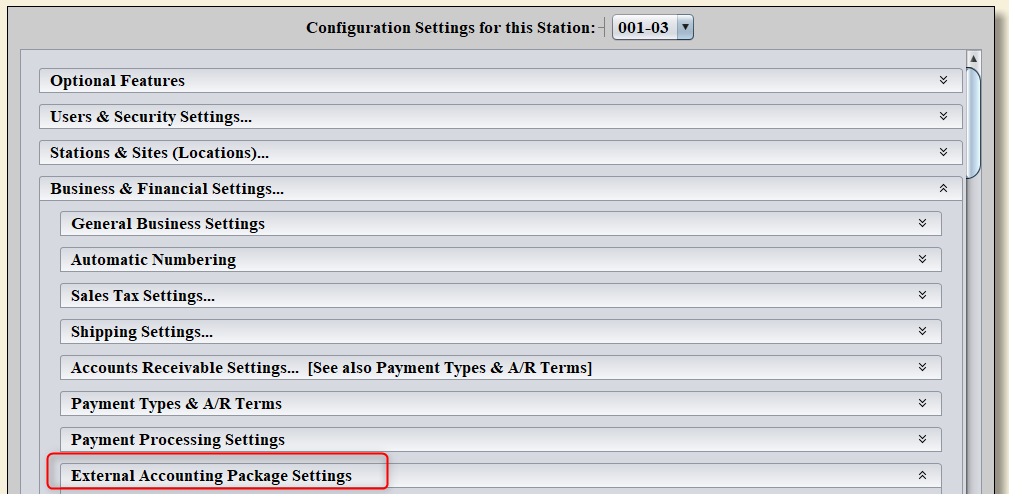
From the “Main Menu,” choose “Tools” and then “Program Options,” then expand the “Optional Features” section. Turning on “Vendor Invoices” is optional but recommended. You can always turn this off if you don’t want to use it.
Next, click on “Business and Financial Settings” and “External Accounting Package Settings.“
This is where all your Artisan info for QuickBooks is configured.
The first section is the “Sites” section. Even if you only have one location, it’s a good idea to set up a profile, that way you can use this profile to help you set up QuickBooks at other locations in the future (if you have any).
Open the dropdown and click “Edit List.“

Click “Add” and call this profile “QuickBooks.” Click “OK.”

Select your new profile from the “View/Edit Settings” dropdown.

Next, from the “Accounting Program” dropdown, select “QuickBooks.”

Now we have the “Deposits and Bank Accounts,” “General Accounts,” “Inventory Adjustment Expense Accounts,” “Accounts Receivable,” and “Accounts Payable and Vendors” sections.
Note: The red asterisk indicates a field that is used in most circumstances.
QB Class Name: This option allows you to specify a class to append each account in QuickBooks. This is intended to identify separate entities or stores. Usually, this field is left blank. In the multi-store case, you will also need to create a profile for each QB Class you use.
Primary Bank Account: This is where your cash and check deposits are made. For most, it is also where your Merchant Account deposits are made.

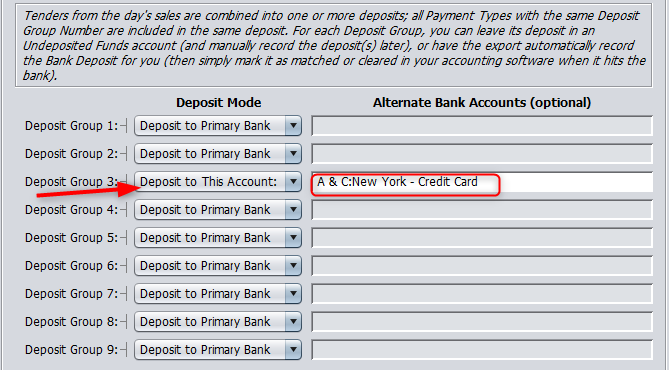
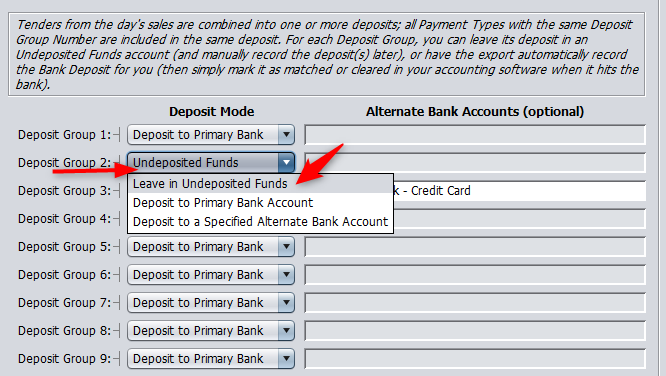
Deposit Groups, Deposit Modes, and Alternate Bank Accounts
Next is the deposit and bank account section.

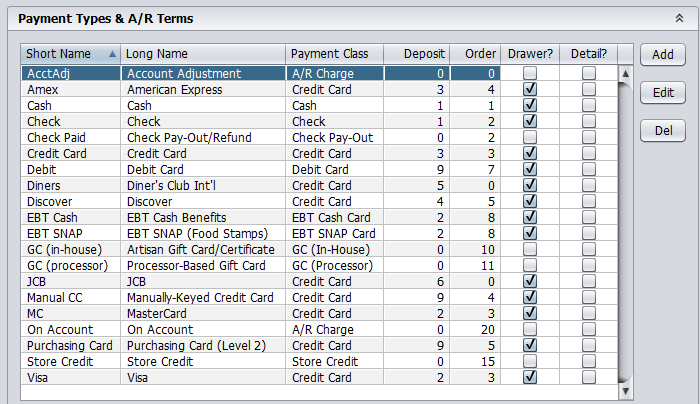
Deposit groups correspond with your payment types, which are found under “Payment Types and A/R Terms“).
Deposit Modes: There are three deposit modes to choose from: “Leave in Undeposited Funds,” “Deposit to Primary Bank Account,” and “Deposit to a Specified Bank Account.” Normally, you’ll leave your deposit groups set to “Deposit to Primary Bank.” But there are exceptions.
For example, let’s say you want your credit card deposits to go into a specific account or group (let’s say Group #3). Click on the dropdown for “Deposit Group 3” and change it to “Deposit to Specified Bank Account.” Enter your information.

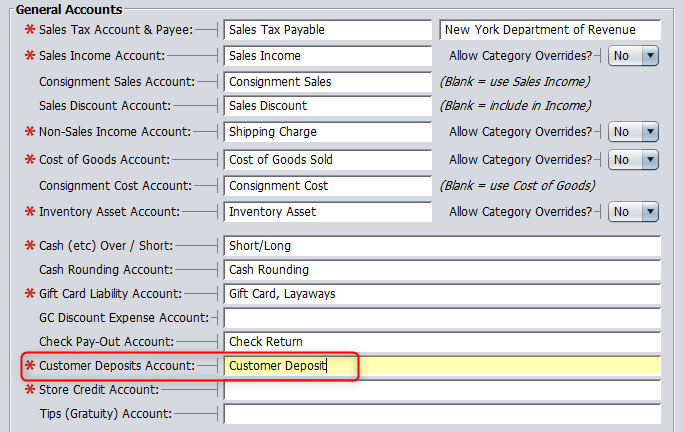
General Accounts
The next section is the “General Accounts” section.

NOTE: We assume you already have a QuickBooks Company File and Chart of Accounts created. If not, please read this tutorial from QuickBooks first, then this one.
We’ll go over some examples soon of how to set up accounts in QuickBooks and Artisan, though we recommend reading those articles above.
Account Types

Sales Tax Account & Payee: When you collect Sales Tax, you don’t pay it to the state daily, so this is the account that accumulates your sales tax due into a Current Liability account. Often overlooked is the Payee name. It is critical that you enter this name correctly.
Sales Income Account: This is where money from net sales (before sales tax and costs) is kept. This account is used for all sales or any remaining portion after category and consignment portions have been deducted.
Allow Category Overrides? If you want to further break down your accounts based on the Artisan Categories, then you can allow it here. Any categories that are left blank will use the primary account. This option is repeated for various accounts below. Since you can run breakdown reports from Artisan, this is normally not necessary and can create considerably more work. It does make using Vendor Invoices almost a requirement.
Consignment Sales Account: This is if you want to separate out your consignment sales. If you leave this field blank, then the Sales Income account will be combined with the Consignment Sales.
Sales Discount Account: Sometimes if you have a lot of discounts, you may want to see this total on its own in QuickBooks. If so, specify it here, otherwise they will be included in the Sales Income Account.
Non-Sales Income Account: This is a necessary account if you consider Outbound Shipping, Alterations, or any other service to be not part of your normal sales income. If you have any non-sales categories in Artisan and you have activity on those, then you must specify and account here. We generally assume it is best to set this up to make your ongoing exports more reliable.
Cost of Goods Account: Cost of Goods Sold or COGS is an accounting term, and it is the raw cost of normal and consignment sales, normally excluding transportation costs. Transportation costs may be included if Artisan has been configured to do so, but most businesses need to immediately expense the transportation costs. QuickBooks often creates this account for you, and they even have a Cost of Goods account type. Understanding how Cost of Goods works is integral to accounting for sales of inventory.
It is critical to understand that when you purchase inventory, it goes into an Inventory Asset account. It is never considered an expense until the merchandise is sold. Artisan will move the cost amount from the Inventory Asset to Cost of Goods Sold as sales are marked delivered. Most sales are automatically marked delivered except special orders and deferred shipping.
Another way to calculate Cost of Goods Sold = Beginning Inventory + Purchases – Adjustments – Ending Inventory
Consignment Cost Account: Consignment Cost is the same as COGS except that the inventory has not been paid for and is owed after the sale. If you handle a significant amount of consignment inventory, we highly recommend separating out your consignment sales in QuickBooks. When you don’t specify an account here, consignment cost will be included in the Cost of Goods Sold.
Inventory Asset Account: This is a required account if you have any owned inventory. Artisan adds and subtracts from your inventory value as items are invoiced, sold, or adjusted. Note that just receiving inventory will NOT increase this value. You must either use Vendor Invoices or manually enter your invoices into QuickBooks. It works this way so you don’t double enter your inventory. Ultimately you have to pay for that inventory and when you do, it becomes an Inventory Asset in QuickBooks. See Also Cost of Goods and Accounts Payable.
Short / Long Account: Often we have cash and checks (or manual payment/credit cards) that are over or under what we are expecting. During the Day End process, you can make adjustments and this the account where that goes. It can be considered an expense.
Gift Certificate Account: Gift Certificates or Gift Cards are often confused with sales. Gift Certificate that are sold are not actually sales. There is no sales tax due and nothing to report as sales until they are redeemed. Until then they are just a Other Current Liability in QuickBooks. This is the liability account that holds the funds until a sale is completed. On the Sales Summary report this total can go up or down depending on the activity. Eventually this account should zero out but inevitably some will never get redeemed.
GC Discount Account: Sometimes you might want to discount a Gift Certificate. This account makes this activity more visible when those discounts are not combined with the face value of the card.
Check-Pay-Out Account: If you use the Buy From Customer feature or if you would ever write a check to your customer for a refund, this is where that money goes when you use this payment type in a sale.
Customer Deposits Account: Anytime you enter a special order or deferred shipping (manually mark shipped orders delivered) then it isn’t a sale until it is delivered. Sales tax is not due, and the sale will not be reported. This is very similar to the Gift Certificate account and this money is also considered an Other Current Liability in QuickBooks. When the sale is marked delivered then the money from this account is used to pay for the merchandise.
Store Credit Account: Again, almost the same thing as Gift Certificates and Customer Deposits. This is the holding account for Store Credits and this money is used as a payment for a sale. This another Other Current Liability account in QuickBooks. This isn’t considered a sale and no sales tax is due.
Tips (Gratuity) Account: Here we have yet another type of holding account. This one holds the money collected for tips for your employees (which you could be considered one of). When you write payroll checks or disperse these funds to your staff, then this Other Current Liability account should be deducted in QuickBooks. It is your responsibility to make sure you use this account in QuickBooks when you disperse those funds.
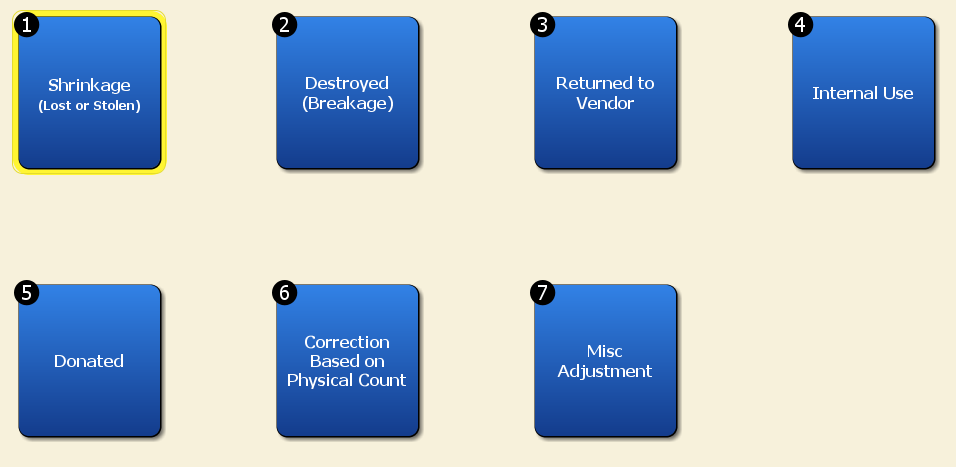
Inventory Adjustment Accounts: This is a big account, and we suggest you split this one up into the 5 sub-accounts shown below. Basically, any time you change your inventory value that isn’t part of receiving or selling, then it is an adjustment. Adjustments are very important because they are expenses, and each of these should be Expense Accounts in QuickBooks. Often these adjustments are associated with adjustment types in Artisan.

To specify the sub-accounts in Artisan, use a colon, “:”. So, Inventory Adjustments:Shrinkage for example.
Shrinkage Account: Technically this is inventory that has been lost or stolen, but during a physical inventory any shortages are classified in this category. If you know that you failed to enter in a Donation for example, you should enter this transaction in before performing a physical inventory.
Destroyed Inventory Account: Anytime something is broken or damaged beyond the ability to sell it at a discount, then it is an expense if the damage is not the responsibility of the vendor. If you are returning defective merchandise, use Return to Vendor instead.
Internal Use Account: If you consume some of your product in the process of selling them, then that is considered Internal Use. For example, if you sell candles and you actually burn some of them as demonstration. That is considered Internal Use. The same is true if sell paper towels and you use those to clean your counter. You can’t just go pull them off the shelf as needed. You should enter them as an Internal Use adjustment. Internal Use may also have tax implications and you may actually owe the sales tax on them just like you would if you sold them.
Donated Inventory Account: You may want to give away merchandise to a charity or participate in a charitable promotion. This is how you keep these separate and whether they are tax deductible or not is a question for your accountant.
Other Inventory Adjustment Account: This is the account for everything else that isn’t categorized above.
Subtracting Inventory
When you subtract inventory from the Item Record (or other places in Artisan) you might get this prompt to tell Artisan why:
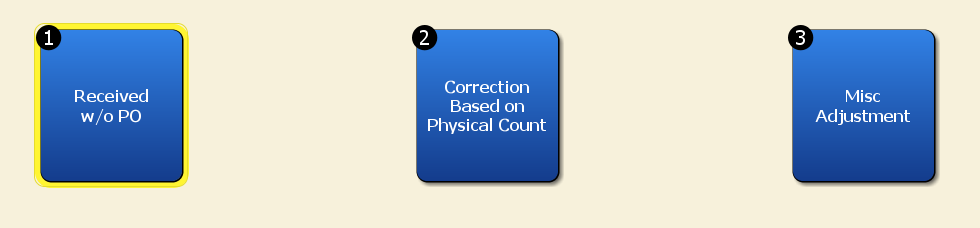
Adding Inventory
When you add inventory to the item from the Item Record, you’ll see this screen:

Accounts Receivable: If you use the House Accounts or full-on A/R, then this group of accounts handles that.
Accounts Receivable Account: All A/R funds go through this account. This account holds the balance of your open accounts and individual transactions may increase or decrease this balance as sales are charged and paid off. This is an Other Current Asset in QuickBooks.
Finance Charge Income Account: Finance charges are an Income account in QuickBooks.
Late Fee Income Account: Late fees are an Income account in QuickBooks.
Manual A/R Adjustment Account: When it is necessary to edit the A/R balance field directly rather than through a sale or a return. This could be one way to write off bad debt and therefor this account is an Expense in QuickBooks.
Create Individual A/R Transactions: If you plan on sending out statements generated by QuickBooks, this is how you would do it. Since Artisan has complete statement generating capabilities this option is normally not used.
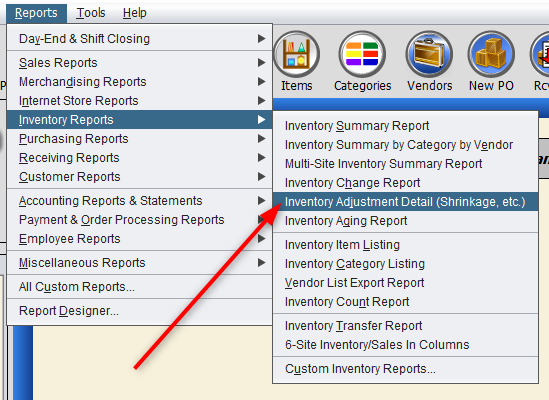
Note: For a breakdown of your activity, run the Inventory Adjustment Detail report. Click on “Reports,” “Inventory Reports,” and “Inventory Adjustment Detail (Shrinkage, etc.).”
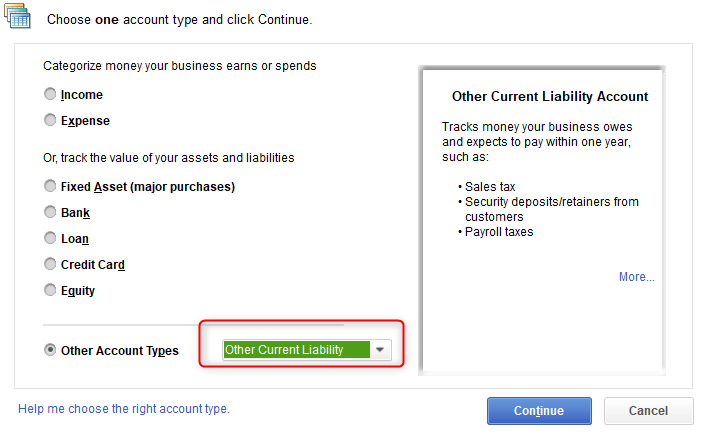
Creating Accounts in QuickBooks
To create accounts in QuickBooks, you’ll need to open your “Chart of Accounts.” Click on “Lists” and “Chart of Accounts.”

Click “Add New Account.”
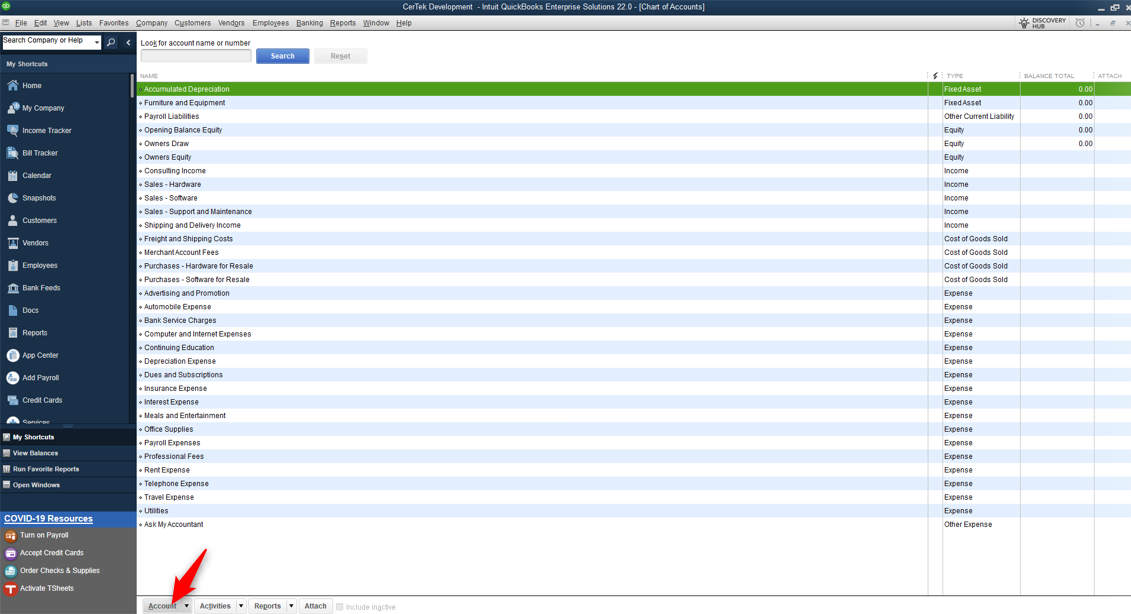
Your account type and title depend on what account you’re creating.
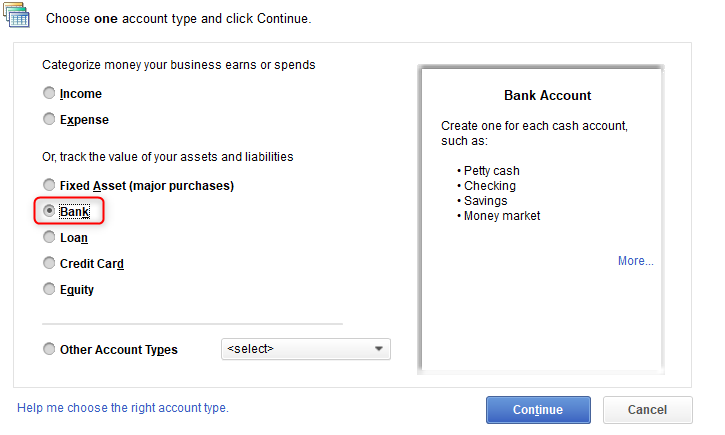
For example, let’s create our first account – our bank account.
From “Account Type,” select “Bank.”
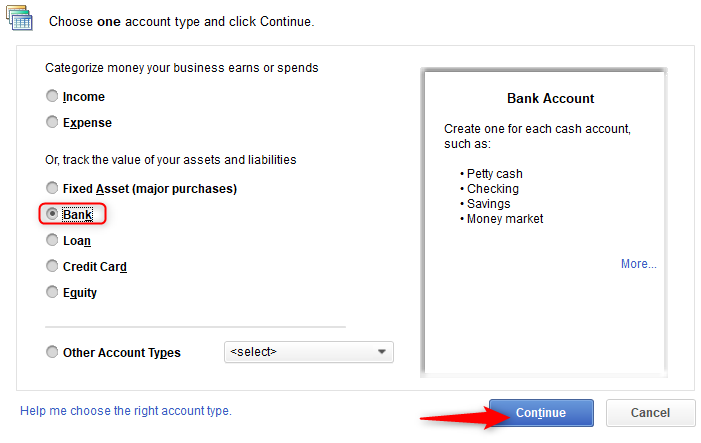
Give your account a name (typically the name of your bank). Save the account.

Importing and Exporting Files
In order for transactions and other data to show up from Artisan to QuickBooks, you’ll need to import an .iif file into QuickBooks.
NOTE: Before exporting to QuickBooks, you’ll need to handle any pending stock corrections.
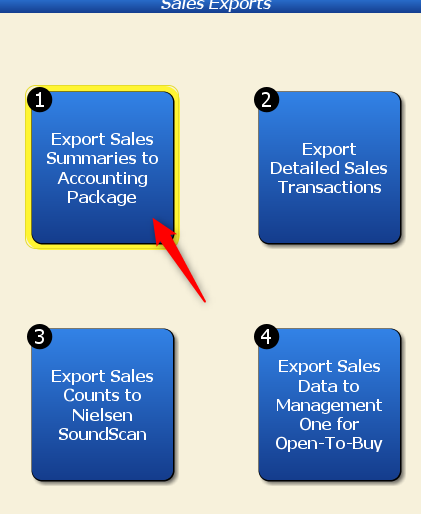
From Artisan, run a day end. Then, head to “Accounting” and “Sales Exports.”
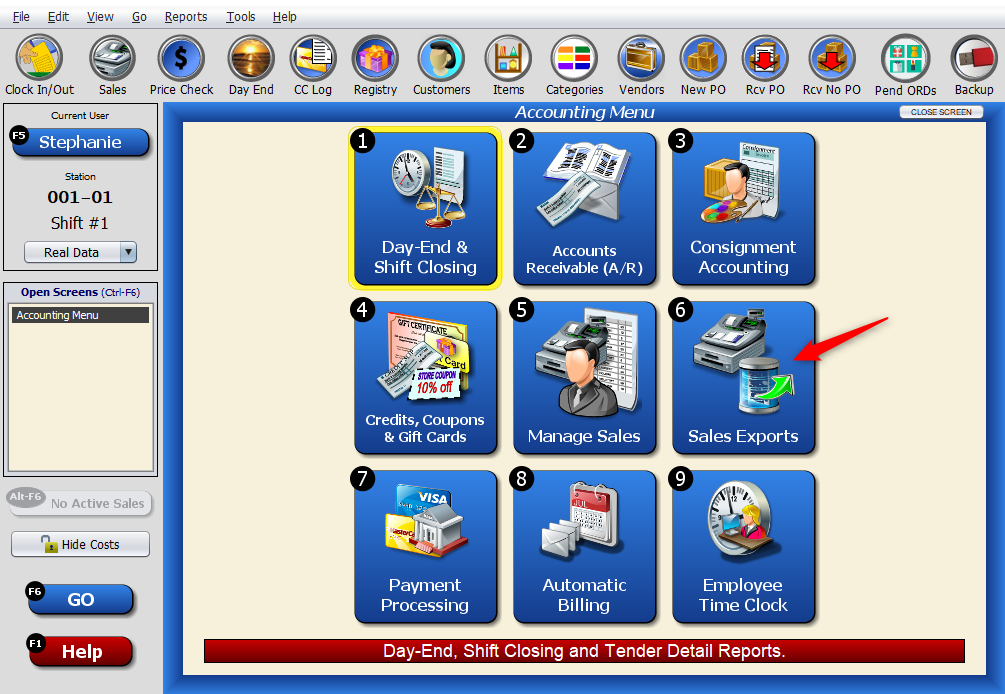
Click on “Export Sales Summaries to Accounting Package.”

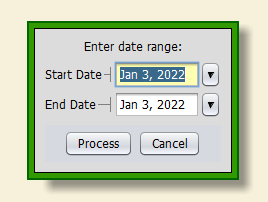
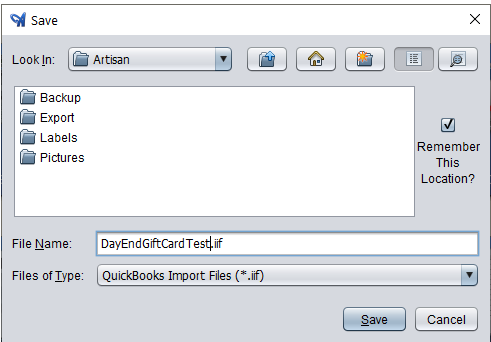
Enter a date range and save the file.
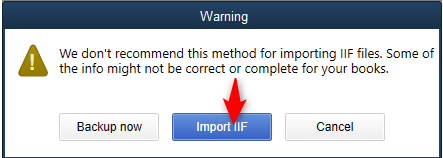
In QuickBooks, click on “File,” Utilities,” “Import,” and “IIF Files.”
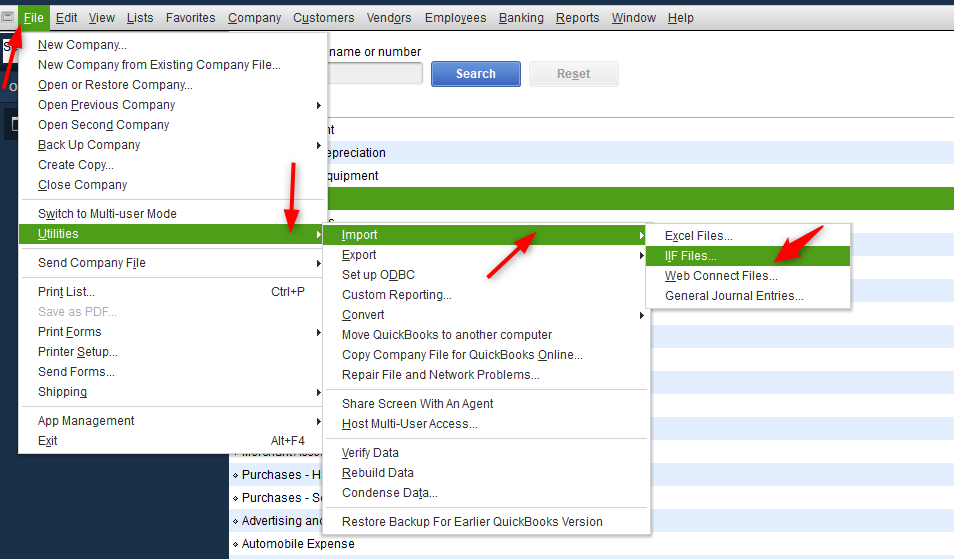
Click “Import it for me, I’ll fix it later.”

Locate the file.

Normal Sales
(Visit the “Creating Accounts in QuickBooks” section if you haven’t already).
Let’s say we had an order that totaled to $42. We’ll export the sale and import it into QuickBooks.
As we open our chart of accounts and navigate to our bank account, we’ll see the latest sale at the bottom of the screen (click to enlarge).

Customer Deposits
If you need to collect a customer deposit in the event of a layaway or special order, follow these steps.
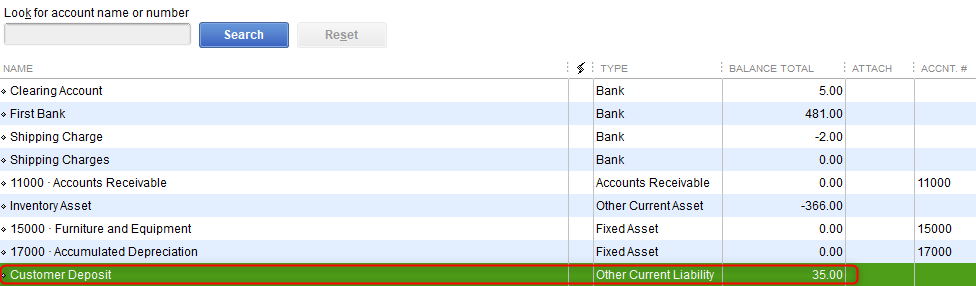
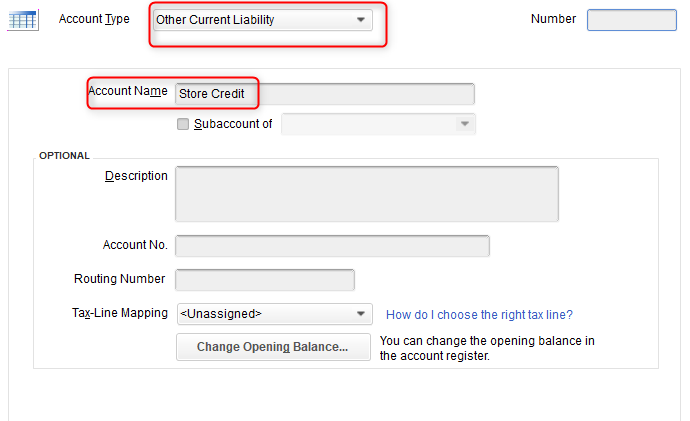
Since we’re setting up a deposit account, we’ll select “Other Liability.” Name it “Customer Deposit.”
In Artisan, scroll down to “Customer Deposits Account” and enter “Customer Deposit” in the field.
Let’s create a customer deposit to see how this works. This customer is buying a watch that we currently don’t have in stock. We’ll make the sale a special order, collect a deposit, and process the sale. Then, we’ll run our day end.
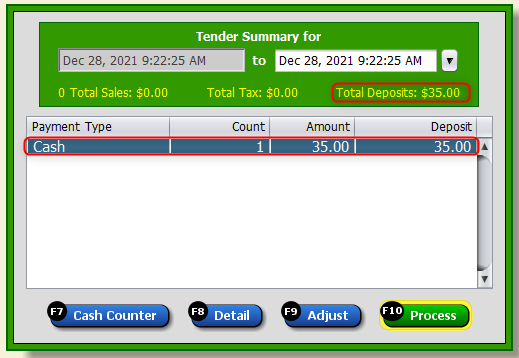

Let’s import the .iif file into QuickBooks. The customer deposit is recorded.
Gift Cards
For this example, since we’re setting up a gift card account, we’ll select “Other Liability.” Gift cards are considered a liability until they are delivered.

Call the account “Gift Card.”

In Artisan, go to your “External Accounting Settings” and scroll down to “Gift Card Liability.” Enter the title for the Gift Card account you just made (in our example, “Gift Card”). Press “Save.”


Choose “Sales Exports” from the “Accounting Menu.”
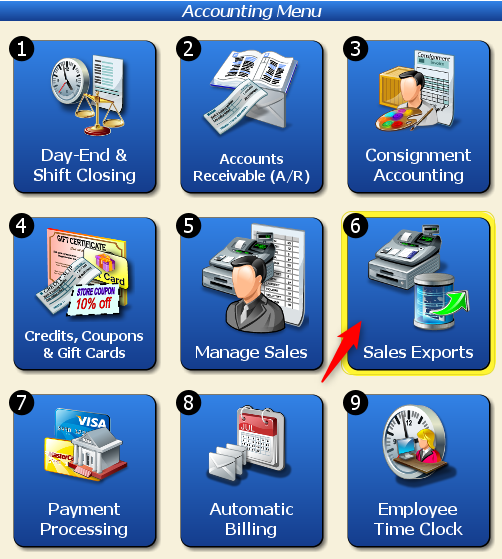
Choose “Export Sales Summaries to Accounting Packages.”
Enter a date range.

Now, our gift card statement is in QuickBooks (click to enlarge).

Shipping Charges
What if you want to add a shipping charge to a sale? Let’s see how that will look like in QuickBooks.
First, you’ll need to create a Shipping Charges account in QuickBooks.
Make sure the “Account Type” is set to “Bank.”
Call the account “Shipping Charges” or something similar.


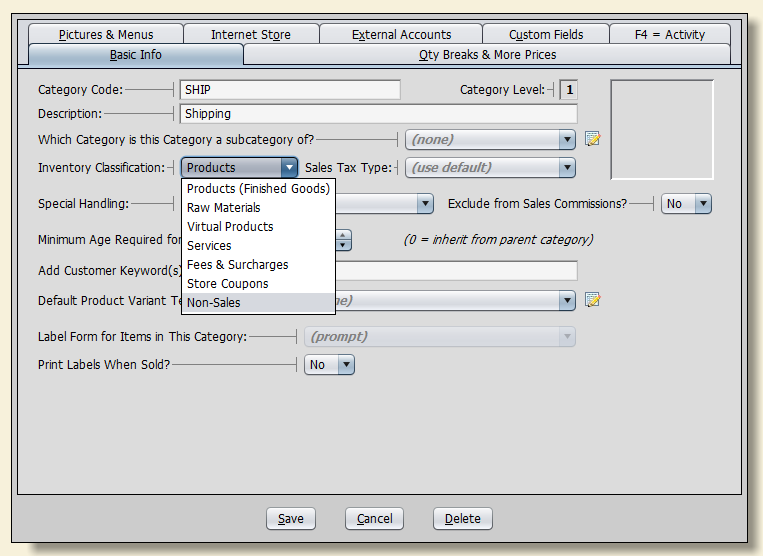
Create an item record and call it “Shipping Charge.” Edit the category list.
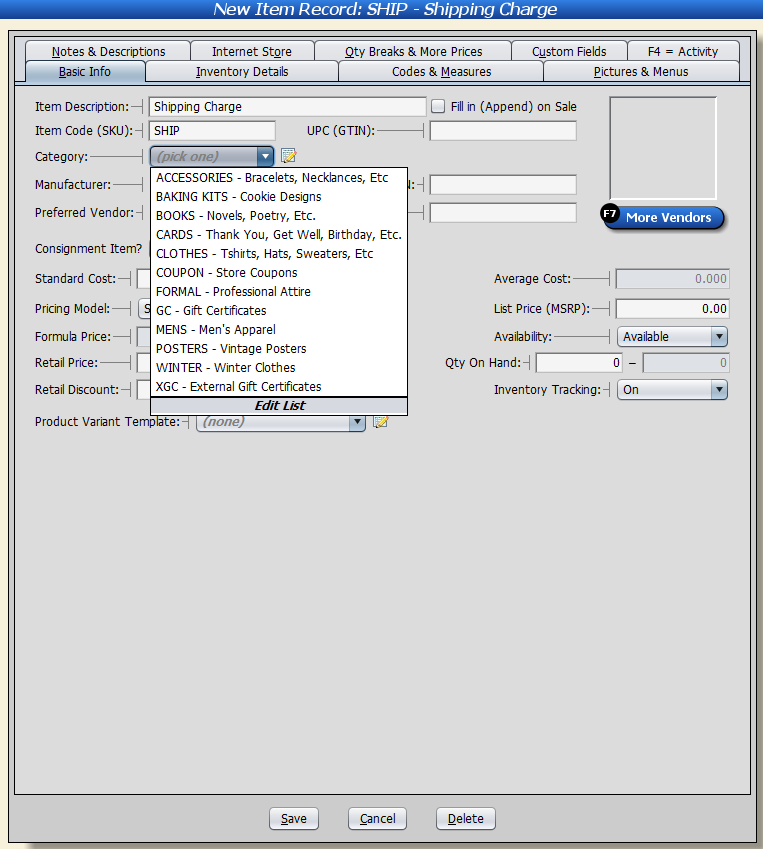
Name the category and change the “Inventory Classification” to “Non-Sales.” This will separate your shipping charges from your other accounts in QuickBooks.

Create a sale and add the shipping cost as a line item. Add the price for the shipping cost.

Once you’ve processed your day end and imported the file into QuickBooks, you should see your shipping cost.

Store Credit
First, we’ll write “Customer Deposit” in the “Customer Deposits Account” field.

Next, we’ll head into QuickBooks and create an account called “Customer Deposit” under “Other Liability.”
Let’s say a customer bought an item and wants to return it. They want their payment type as “Store Credit.”

After we finish doing that, we’ll export our sales summary and import it into QuickBooks. Our store credits should appear in the Store Credit section.

Vendor Invoices and Consignment Reports
To export consignment reports and vendor invoices into QuickBooks, head to “Accounts Payable & Vendors” in “External Accounting Package Settings.”
Navigate to “A/P Export Mode.” From the dropdown, select “Export Vendor Invoices & Consignment Statements as Bills Due.”

Press “Save.” Now, transactions related to vendor invoices and consignment sales will export with your normal day end. For consignment sales, you might need to close out twice before they appear. The first time is to close out consignment transactions. Then, once those are closed out, you can run statements and close out again. The statement bills will appear on the last day end.
General Notes
Some notes to keep in mind about QuickBooks.
Receiving Items
Receiving does NOT go into QuickBooks. For example, when you receive a PO, you do not enter that PO into QuickBooks. Make a vendor invoice for those items, then export that invoice into QuickBooks.
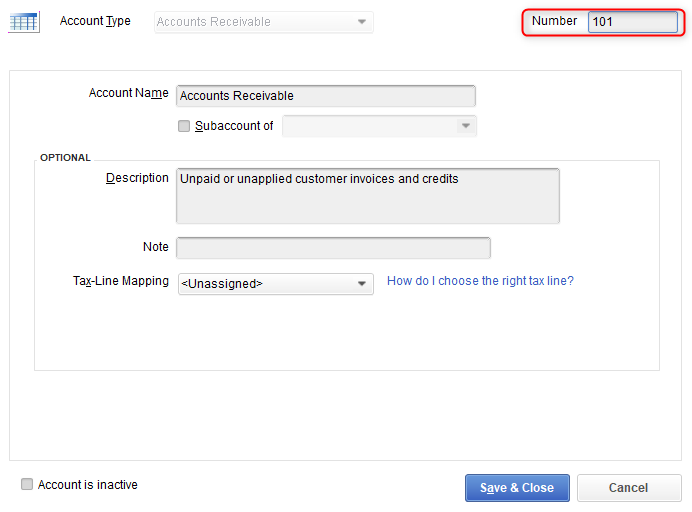
Numbering Accounts
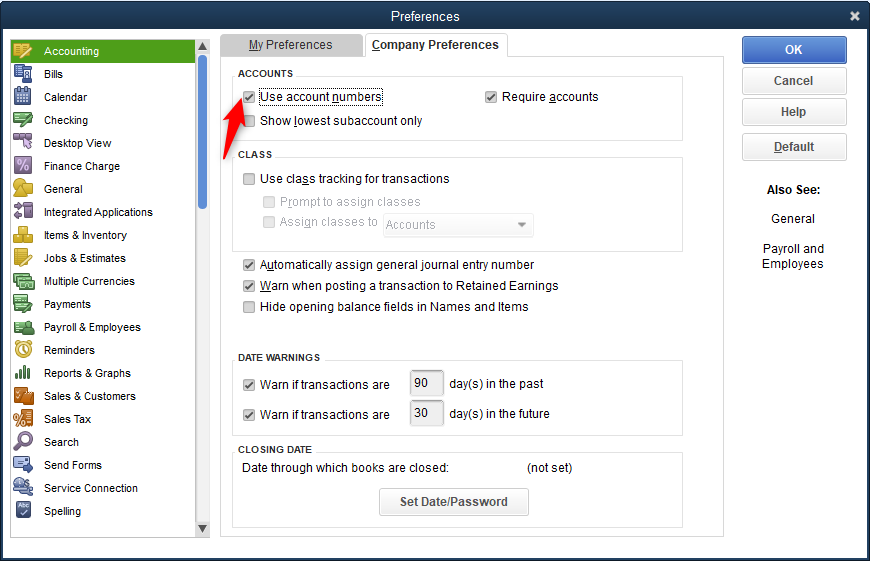
Some people find it easier to number their accounts in QuickBooks, though this is entirely optional. If you wish to do so, select your account in QuickBooks.
Head to “Edit” and “Preferences.”

Click on “Company Preferences.”
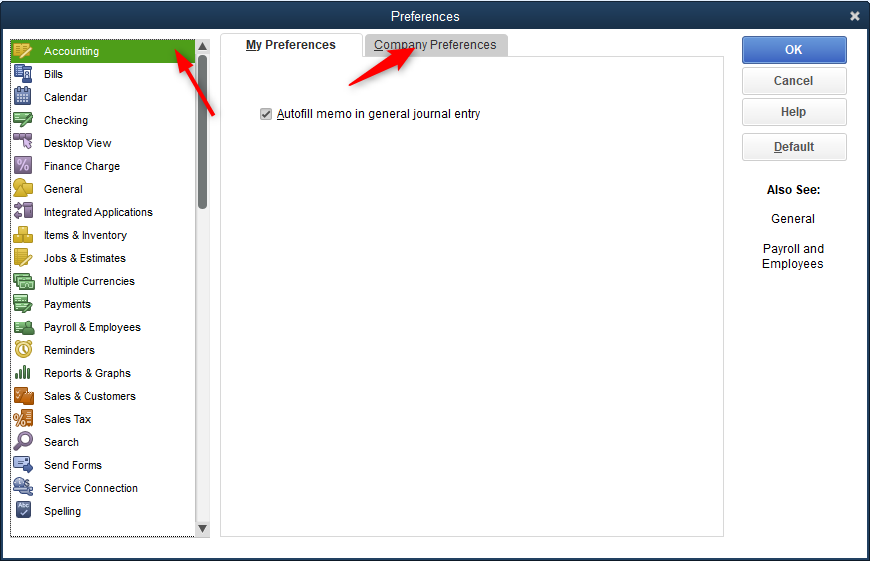
Check “Use Account Numbers.”
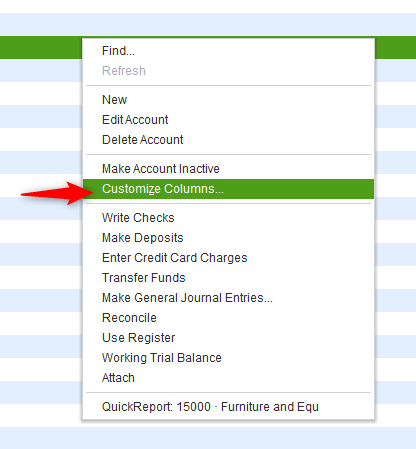
Right-click on your chart of accounts and select “Customize Columns.”
Move “Accnt. #” to “Chosen Columns.”
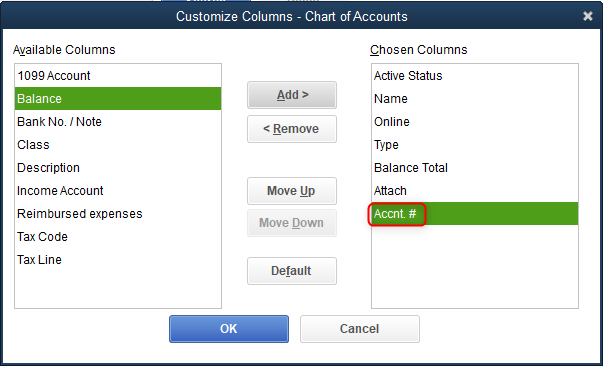
Select whatever account number you want to change.

Enter whatever number you want to use (ex. 101).