There are 3 main types of Inventory Records. Category Records, Vendor Records, and Item Records.
Category Records keep information about groups of products. You may have heard them called “Department” and “Class.” Artisan allows multiple levels of categorization, so we just call them a category.
Vendor Records keep information about the companies and people you buy products and services from.
Item Records are the individual products or services that you sell. You may have heard them called SKUs. Each Item Record must have a Category and Vendor associated with it.
Before you can start selling products or services, you must create at least one of each of these records.
Category
It is easiest to start with Categories, since you usually know a good deal about what we are going to be selling. For example, a department store might have a Women’s, Men’s, Shoes, and Jewelry departments. When you are making purchasing decisions, it is also useful to have these broken down further. So, for Women’s, we might have dresses, tops, knits, and so on.
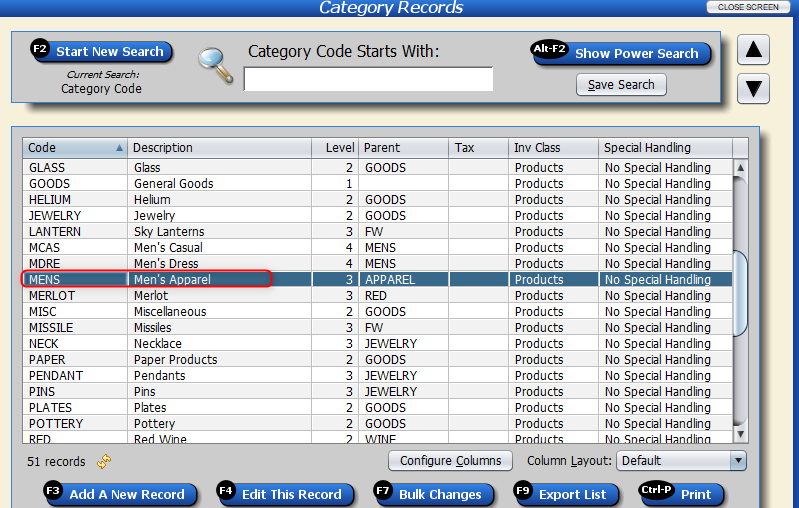
Every category record has a CATEGORY CODE which is basically an abbreviation on the potentially longer Category Description. Sometimes the code is a number, but it certainly does not have to be a number.
In this case our code is MENS, and the description is Men’s Apparel. Open this record to continue using either the Edit This Record button or F4 or double click on the record.
The next field is “Which Category is the Category a subcategory of?” Artisan lets you put one category inside another, and this is where you specify which one you are putting it into. You might think of this as the Parent Category, or the next level up. Artisan assigns a category level number for you automatically. Top level categories are Level 1. You might think of these as Departments, Level 2 as Class, and Level 3 as Sub-Class.
You may create structures with up to 9 levels with an unlimited number of categories. Don’t get too carried away, though. We recommend 3 or 4 levels at most for normal situations.

Sometimes, it is a good idea to create one huge category to be able to control everything in your store. In the sample data, we called it “GOODS – All Goods.” If we wanted to discount our entire store, for example, we could simply edit the GOODS category. Otherwise, you would need to put the discount in every top-level category. Artisan lets you re-arrange your category structure later, without any punishment. The sales history will move over as you rearrange your categories. Click here if you would like more information on categories.
The other fields in this record control how items in the category behave. For example, if a particular category is not taxable, we would establish that here in the category record. Other controls determine if it is a Product or a Service. There is also important information about how items in this category are priced.
Click on the Qty Breaks & More Prices tab to see the pricing schemes choice. Here you can select or even create an appropriate pricing scheme. Pricing schemes can make entering new items faster and help you be more consistent. They can also help less experienced staff create new item records without direct supervision. We suggest that you create a scheme, even if you don’t force your items to be locked on it. When you create new items, the price will default to the scheme once you put in your cost.
You can set up a pricing scheme and have all the items in this category honor this scheme. This is a time saving feature as well as providing a flexible way of re-pricing all your items in this category quickly. Be careful, though. If you print a price on your stickers, then you should edit prices with caution, so your customers don’t get confused when the sticker shows one price, and it rings up at another one.
Let’s take a closer look at how to setup a pricing scheme. There are several ways to get here, but let’s start with the main menu. Click on Go and then select Inventory and then Pricing Schemes. You can see that we have the Keystone in the list, but we want something else. Click on F3 to add a new record. Let’s give our new scheme a name, say “Menswear Markup”. Change the Markup to be 2.5 and then round to 1.00. Click on Save. Now back let’s get back to Category record, by clicking on the close screen.
From the pull down, choose Menswear Markup. Save the category record and let’s quickly take a peek at a new item record and see how it works. Click on the Items Button and then Press F3 to create a new one. Type in some kind of description, then change the category to JEWELRY and then enter in a cost. You can see that our price was automatically calculated for us. Let’s close the Item Records for now and we will explore that in depth next in the “Item Records” video.
There are many other fields here in the category to come back and explore later.
The Vendor Record keeps up with everything about your vendors. It also has a Vendor Code which is an abbreviation for their name. It can be a number or it can be initials or whatever you want. We recommend that it should be short, but not cryptic.
Here you can store your account number and the vendor’s contact information.
There is also a pricing scheme for the vendor and you can specify which scheme you want to use for each item. It works just like the one in the Category Record and we can even choose from the same list of Pricing Schemes.