This article explains how to setup the Star TSP series printer for Artisan 4.0 with or without a cash drawer
Note: There are some special configurations that need to be followed for current versions of Artisan 4.0, this article and the procedure itself will most likely change as Artisan finishes beta testing.
Step 1: Download & install the driver
First, we will install the printer using the manufacturer’s driver as any other regular printer.
1. Download the driver from http://www.starmicronics.com/support/default.aspx?printerCode=TSP100
2. Make sure you click on futurePRNT V5.50 Lite (119 MB) to start the download.
3. Locate the driver in the designated downloads folder, it should be named “tsp100_v550_lite”.
4. Right click on “tsp100_v550_lite” then select Extract All, then select Browse on the next window that prompted, after that then select the destination folder where you like to save the extracted item(s) and hit ok then hit Extract.

5. In the folder, locate the actual driver package to be installed, then double click on Autorun => Run just as the image below displays.

6. Now you will see the TSP100 star printer installation Menu, hit Installation=>Accept =>YES to allow PC changes.
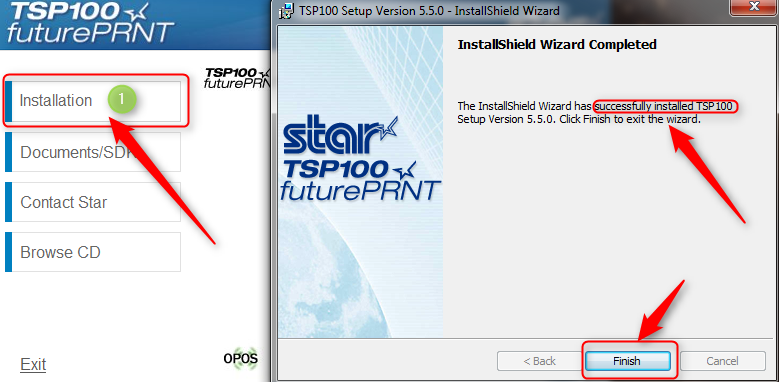
7. When the Set up wizard is launched hit NEXT and follow on screen instructions to finalize install, once done you will get a InstallShield Wizard Completed Successfully, hit Finish. (See Image Below).
Step 2: Verify printer is correctly installed
Now make sure the printer has been installed by checking the Control Panel / Devices and Printers.
1. Click on Start icon on the task bar.
2. Select Devices and Printers .
3. Now make sure your Start TSP 100 Shows up under Printer and Faxes. (See Image Below).

Step 3: Set receipt printer in Artisan
Now, it is time to set it up in Artisan so that it prints receipts BUT does not open the cash drawer (YET).
1. In Artisan go to Printer Configuration (Main Menu=>Tools=>Program Options=>Device Configuration=>Printers)
2. Configure the Star printer following this image.
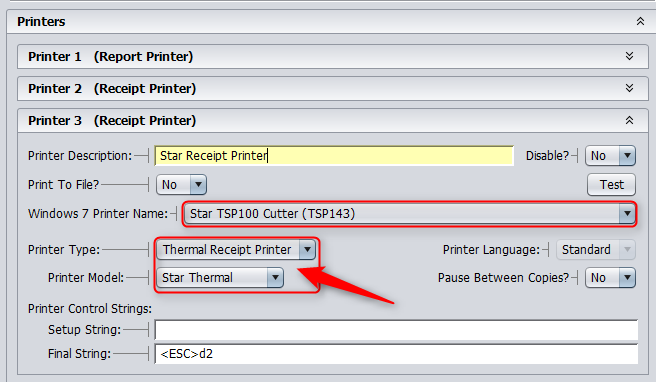
3. The most important setting here is “Printer Model”, if you will use a cash drawer attached to this printer, make sure “Star Thermal” is selected as the option.
Step 4: Setting Cash Drawer in Artisan
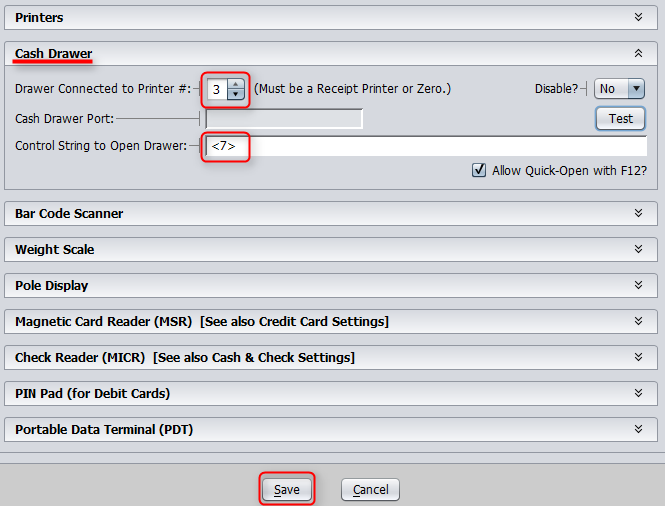
1. Go back to Artisan Device Configuration Screen
Set a printer on slot 3 named “Star Receipt Printer” using the fictitious printer we just added on CUPS
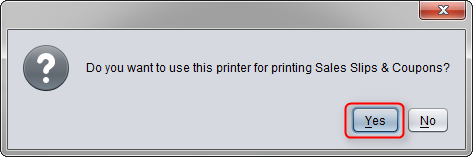
When asked whether or not to use this printer for Sales Slips & Coupons, select “Yes”
Set the Cash Drawer using this printer 3, also add the Control String to Open Drawer: <7>
Follow the image below.
Save your settings. Everything should work correctly.
Things to test:
- Test printing a receipt from the Receipt Printer “Test” button
- Test opening the cash drawer from the Cash Drawer “Test” button
- Make sure there are not jobs stuck in any queue. If there are jobs stuck, clear them and make sure “Other Thermal” is set for both Receipt and CashDrawer printer within Artisan.
- Lastly, test doing a sale. It should print a receipt and open the drawer too.