
Artisan has worked with accounting stores for over twenty years. As a result, the program has powerful tools to help you purchase, sell, and organize your consignment collection. To get a better understanding of how consignment works in Artisan, please review this in-depth article.
Select a header to quickly navigate to its corresponding section:
- What is Consignment?
- Accepting Consignment Items: Purchase Orders vs. Receiving Logs
- Step 1: Create a Vendor Record
- Step 2: Purchase Order & New Item Record
- Step 3: Adding the Item to the PO
- Step 4: Receive the PO
- Step 5: Selling the Item
- Step 6: Paying the Artist
- Step 7: Printing Consignment Statements
- Re-Print and Unposting
- Inventory Summary Report
- Handing a Mix of Consignment and Owned Inventory from the Same Vendor
- Inventory Adjustments
- Correcting Mistakes
- Physical Inventory Counting
- View List of Consignment Items in Stock
- View List of All Consignment Items
It is a great responsibility for you to accept merchandise on consignment. It is critical that you keep accurate records and have processes in place. Your reputation can dramatically affect your ability to receive consignment merchandise. This is where Artisan POS comes to the rescue.
However, not everything is done for you automatically. It is very crucial for you to follow some procedures. This article will outline some standard procedures that work best with Artisan.
- For the sake of this discussion, we are going to use a typical example that occurs with Artisan. Although there are many other types of inventory that Artisan can handle, our discussion is going to consider the case of art being placed on consignment for a gallery.
- If you have a Consignment Mall or Antique Mall, then this article is not for you. Please call for assistance if this is your situation.
What is Consignment?
Selling items on consignment can increase your income without the risks of owning inventory. But with less risk comes less reward, so you can expect to pay more for the item – and your total profit is often reduced.
The actual percentage you receive depends on what type of product you are taking on consignment, the value of that item, and the popularity of the person who is giving you the item on consignment. In addition to the actual percentage, there is also the consideration of whether or not discounts are included in the calculation.
Art is a very popular item that stores put on consignment. Typically, art has a 60% consignment cost. That means that the consignor (the person who owns the inventory) receives 60% of the revenue. The revenue is paid by the consignee, which is the store. Essentially, consignment is accepting inventory that you pay for after it has sold.
Accepting Consignment Items: Purchase Orders vs. Receiving Logs
The single most important detail you need to know when it comes to tracking your inventory is exactly what inventory you are taking on consignment and when and where it was received. Additionally, it’s usually a good idea to note the condition of the inventory if there is any obvious damage.
For this article, we’re assuming an example of an art gallery. When the art is received, the artist will usually have an inventory list, and the gallery signs receipt of that inventory. Hopefully, both parties have a copy of this signed receipt.
The gallery would then either make a Purchase Order for the items or receive them into inventory without a PO.
We highly recommend that you make a PO instead of just receiving the items without a PO, because this is a better record of what actually occurred. You can even note the condition of the art on the PO itself (on a note line below the description of the item).
If you receive the art without a PO, then you must rely on Artisan’s Receiving Report, which isn’t as flexible. Additionally, there is no good way to put in notes, such as the condition of the item. However, you can filter the Receiving Report by the vendor, and only include consignment items, so it is certainly a viable alternative. Notes would have to be put in the item record, but that only works when you only have one of each item.
Step 1: Vendor Record
The very first thing that you must do is create a vendor record for the artist (or vendor).
Click on the “Vendors” icon or click on “Inventory,” then “Vendor Records” from the “Main Menu.” Create a vendor by pressing F3 on your keyboard or “Add a New Record.”

1a. Give the vendor a code (which can be set up automatically in Artisan if you have that configured). Fill out the vendor’s contact information and additional information. Then, click on the “Pricing & Consignment” tab.
1b. Set “Consignment Vendor?” to “Yes” to mark this vendor as consignment in Artisan.
1c. Decide if any new items by this vendor will automatically be considered consignment items.
1d. Determine the “Default Consignment Cost Model.” Sometimes the artist wants a fixed cost and leaves it to the gallery to set the price. Sometimes the artist is willing to discount the retail price and accept a reduced cost for the art, especially if the art has not sold for a long period of time.
1e. Set your consignment split. This split is the percentage that you will pay the consignor (your cost).

Step 2: Purchase Order & New Item Record
2a. Click on the “New PO” icon (or from “Purchasing” select “Create New Purchase Order) and select your new Artist / Vendor.
2b. Next, click “OK” or choose “Blank PO.”
2c. Press F2 to conduct an Item Search.
2d. Press F3 to “Add A New Record (Item).”
Notice that in our new item record, Artisan has automatically selected both the Vendor and the Category. Also notice that the Consignment Settings are also set for us from the Vendor Record.

2e. Complete the rest of the details, like Description, Retail Price, and Vendor’s P/N. Note: The Retail Price is often determined by the artist. You can see that the cost has been calculated for you.
Sometimes just this one item does not fit the normal consignment model that is in the vendor record.

You can un-check the box for “Use Consignment Settings from Vendor?” and then change this item to whatever you need.
2f. Leave the Qty on Hand to zero, as this will be updated once the item is received into Artisan.
Step 3: Adding the Item to the PO
3a. After we save the Item Record, it is placed on the PO for us. We can adjust the quantity we are ordering if necessary.

3b. Now, let’s see a different way we can add an item, which can save us even more time. For this example, our item is called “Ocean Pelican.”
Press F2 for Item Search.
We’ll type our vendor code in the search box to bring up the item record we just created, which is highlighted in blue. We’ll press Alt-F3 to COPY the “Ocean Osprey” record.

This will open a new record with all the information from the other record copied over. Start typing the Item Description for this new record.
This is especially handy if you are selling an item that has the same price as the one you just copied. It saves you time from having to input that price again into another record.
Click “Save” and you will automatically get a new item code (in this case, “WS0002” for this new item). It will put that item on the PO for you. If you need to change the price or alter anything else, you can change that info before you press save, or edit the item after it is on the PO by clicking on the “Edit Item” button.
In this case, we forgot to enter the Vendor’s P/N. We can edit the item record directly, or type it on the PO and the Item Record will also get updated.
Tab over to the Vend P/N field and type 1705.

Repeat this step as needed until you enter all your new items. You can save the PO and come back to it if necessary. Make sure you save the PO frequently if it is long, just like you might frequently save a Word Document.
Depending on your Printer Assignment settings, after you save the PO, it will either print automatically or it will open up a preview. This preview is a great opportunity to review and compare with the packing slip document that hopefully came with the delivery. Often, the artist requires that you sign a list of the items you received. If you are entering the PO ahead of time, then you can review the items at receiving.
Step 4: Receive the PO
Now, click on the “Rcv PO” icon in the top toolbar. Or, from the “Main Menu,” click on “Receiving” and “Receive Pending Items for a Specific PO.”
Choose the PO you just entered by double-clicking, or just press enter on the blue-highlighted record.

On the next screen, this is your last opportunity to make sure your list is accurate. Double-check you have the right quantity by looking at your expected quantity and the quantity you are about to receive.
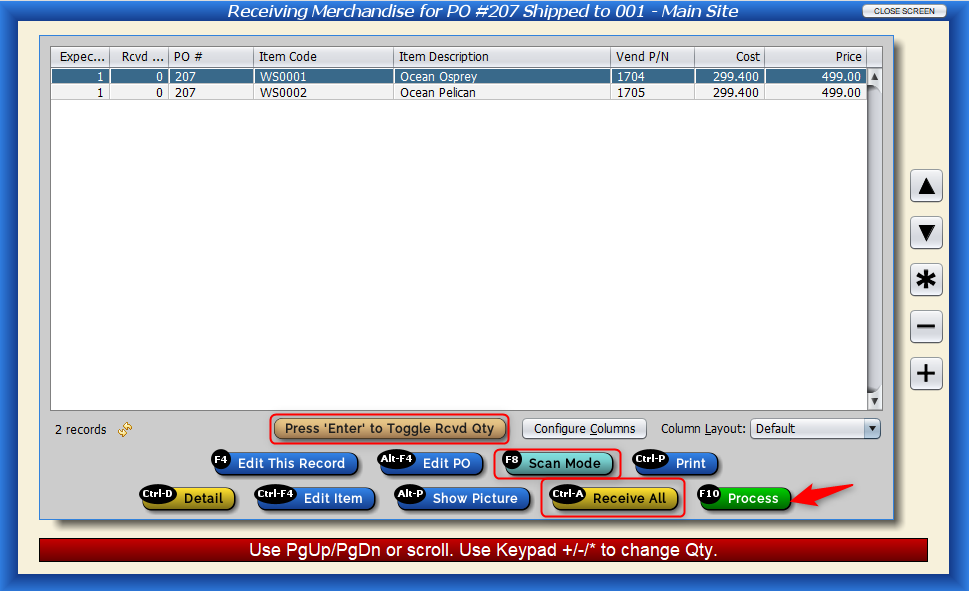
There are a few ways you can update your received quantity. You can do so manually by double-clicking (or pressing enter) on each individual record, or by clicking the “plus” and “minus” buttons on the right-hand side.
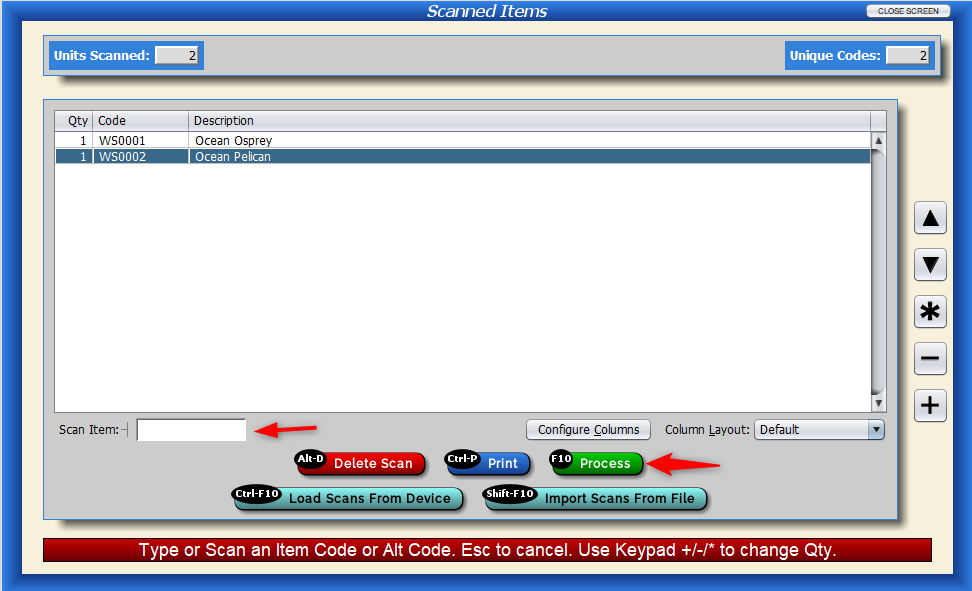
Or, you can enter “Scan Mode” and start scanning each item’s barcode into Artisan. Then, once you’re finished, press “Process” to be taken back to the Receiving screen and process your counts.
If you’ve already counted your items beforehand and are sure you have the correct amounts, you can press “Receive All” as a shortcut, and Artisan will update all received quantities.
When you’re finished, click on “Process” to accept the counts into Artisan.
Step 5: Selling the Item
There is nothing you need to do differently from when you sell consignment or non-consignment items. You can mix consignment and non-consignment items on the same sale. They are just like normal items on the sales screen.
Step 6: Paying the Artist
This is the end of the cycle for the items that have sold. Artisan can help you write the check by automatically exporting the consignment statement as a bill due to your accounting program, if you’re using an External Accounting Connector. Artisan also produces a nice Consignment Payout Statement to accompany your check, or send in email to the consignor.
After the item has sold, you MUST do an End of Day Closeout to post the sale.
On your day end report, you should see Consignment Sales and a Consignment Cost.

Normally, consignment statements are generated on a regular schedule. Most often, this schedule is monthly. Some stores and galleries offset the schedule by two weeks to allow for returns, some even have a full month off-set. For example: If you wanted to pay monthly with a two-week offset, on the 15th of the month, run consignment payout for the previous month.
Step 7: Printing Consignment Statements
Before we start printing statements, double-check a few settings first.
Choose “Device Configuration,” then “Printers,” and “Printer Assignments.”

Look for “Form Printing” and “Statements.” Check off the “Preview?” option for “Consignment Statements.”
This way, you can review the consignment statements one last time before they print.
From the “Main Menu,” click on “Accounting,” “Consignment Accounting,” and “Print Consignment Payout Statements.”
For now, let’s just choose a singular vendor.

Consignment Statement Example

Reprint and Un-posting
You can reprint statements, un-post statements, and then re-do statements as needed. In order to reprint statements, you must know what day you posted those statements for. So, May 31st for example.
Inventory Summary Report
Once your items are received into Artisan, they will show up on the Inventory Summary Report under the consignment section. This is just one of many great reports to review your inventory.
Make sure “Include Consignment Items?” is set to yes–and select “Only?” if you just want to review your consignment items.
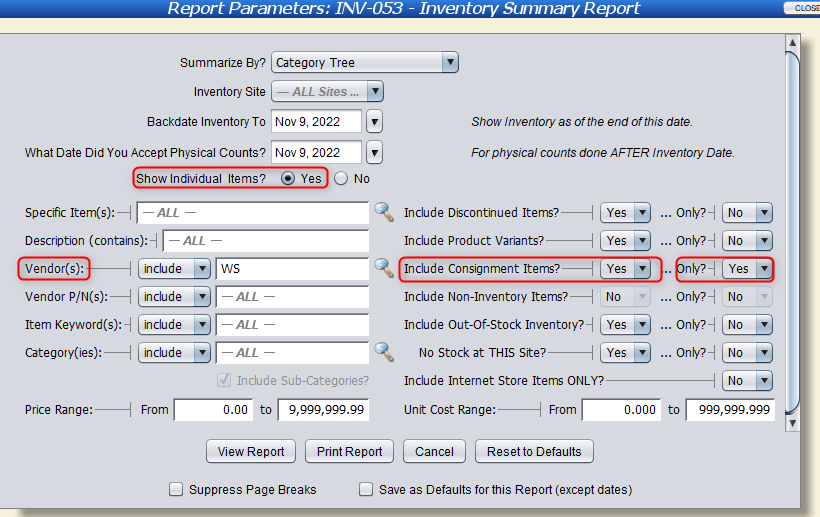
Adjust any other settings, such as price range or category, as necessary. Click on “View Report.”

Your consignment items also show in the “Receiving Log” and on the report called “Receiving Report.”

Handling a Mix of Consignment vs. Owned Inventory from the Same Vendor
You may sell consignment and non-consignment items by the same vendor. Artisan gives you the option in the item record to indicate whether or not that item is consignment.
After the items have been sold from consignment, it is not uncommon to start buying that same item wholesale. In this case, simply go into the item record (after you have no more inventory on consignment) and uncheck the consignment option.
It is a best practice to look at the consignment cost on day end reports and make sure that it looks accurate.
Inventory Adjustments, Shrinkage, Donations, Destroyed, Incorrect Counting
In a perfect world, we would always keep an accurate count of the inventory we have, especially for consignment. In order to fix things in Artisan, you can enter an inventory adjustment. Sometimes this adjustment should be on the consignment statement and sometimes it shouldn’t. Let’s start with a Donation example.
From either the sales screen or by making an adjustment in the item record, you can indicate that inventory has been donated. Should this donation be on the consignment payout statement? Yes! And so, it will be. The same is true for Damages and Internal Use.
It is NOT true for inventory corrections, and here’s why. Let’s say that you didn’t accurately count the inventory you just received, and you said you have 8 when you only have 7. When you figure this out and you reduce your inventory, Artisan wants to know why. If you select “Misc Adjustment” in order to record this incorrect number, this reduction will NOT show on the consignment payout statement.

So, to summarize when actions will be on the consignment statement and when they will not:
- Anytime you make a Sale or Return
- Anytime you reduce inventory for Shrinkage (Correction Based on Physical Count), Donation, Internal Use, or Destroyed.
Inventory changes that do NOT appear on the statement.
- Return to Vendor — because you don’t want to pay them for something they are taking back.
- Misc Adjustment — there should be a way to make a legitimate adjustment that doesn’t report to the vendor.
Correcting Mistakes
If you do a Donation or Internal Use by the Sales Screen, these can be recalled and voided. However, receiving and adjustments made through the item record cannot. Incorrect receiving should be made by either receiving more or by Return to Vendor. Incorrect adjustments in the item record are harder to void and erase. Some corrections will need to be manually adjusted on the Consignment Statement itself. Most of the time this isn’t necessary if you have best practices in place.
By far, the biggest mistake that we see is that items are not marked as consignment when they should be. That is why it is very important to run Inventory Summary reports and confirm your inventory is correctly identified as a consignment. This is also why we go and check this status at day end in case you realize the mistake during or after the sale. Then, after the customer leaves, it gets corrected in the item record. When the day end occurs, the consignment sales will get updated, too.
Physical Inventory Counting
Accepting physical counts will adjust items with shrinkage when you are short. If you later find the item, then it will still be on the payout statement, even if you receive another one. Artisan doesn’t know any errors on the side of the vendor. It is best to take care during the review process of consignment items during a physical count. You should adjust these manually before accepting counts, otherwise, you may have to manually adjust the Payout Statement.
Consignment Items In Stock
This contains all items listed as consignment that have been received into Artisan and currently are in-stock. (To get to this list, click on “Accounting” from the “Main Menu,” then “Consignment Accounting”).

All Consignment Items
This is a list that contains all consignment items in Artisan, not just the ones that are currently in stock.
