In order to customize labels, you need to use the Label Designer.
The best way to start a label is to customize a built-in one. To make sure that you always have a clean base label to go back to, the label forms are Read Only and are protected from editing. To copy an existing label, highlight the form you want to clone and press Alt-F3, just like you would copy an item record.
Of course, you can start from scratch, but this is much harder. We strongly recommend copying an existing layout.
Artisan uses what we call “Label Stocks.” This information describes the physical label itself, such as its dimensions, gap size, media type, and more. Label stocks can only be created by CerTek.
 Example of a Label Stock
Label forms include what fields are on the label, such as text, borders, and color. Label forms include a name that identifies the label and are found in the “Label Forms” section in Artisan.
 List of label forms
Label Stock List
Here is a list of built-in Label Stocks available in Artisan (specified in inches by horizontal x vertical).
| Label # | Size (in Inches)(Horizontal x Vertical) | Number of Labels Across | Material |
| 101 | 3/4 x 7/16 | 2 | Paper |
| 201 | 1 x 1/2 | 1 | Paper |
| 3UP | 1 1/8 x 9/16 | 3 | Paper |
| 401 | 3/4 x 3/4 | 1 | Paper |
| 402 | 1 x 3/4 | 1 | Paper |
| 403 | 1 1/4 x 3/4 | 1 | Paper |
| 404 | 1 1/2 x 3/4 | 1 | Myler |
| 1x1x2 | 1 1/8 x 1 | 2 | Paper |
| 2×1 | 2 x 1 | 1 | Paper |
| 2x1M | 2 x 1 | 1 | Myler |
| 3×2 | 3 x 2 | 1 | Paper |
| 2×2 | 2 x 2 | 1 | Paper |
| 4×3 | 4 x 3 | 1 | Paper |
| 4×4 | 4 x 4 | 1 | Paper |
| 4×6 | 4 x 6 | 1 | Paper |
| 302 | Barbell 3/4 x 1/2 | 1 | Paper |
| 345 | Barbell 3/4 x 1/2 | 1 | Mylar |
| 305 | Barbell 3/4 x 3/78 | 1 | Mylar |
| 340 | Barbel 11/16 x 1/2 | 1 | Mylar |
| 348 | Barbell 1 1/16 x 5/8 | 1 | Mylar |
| 501 | Barbell 3/4 x 9/16 | 1 | Paper |
| 366 | String Tag 7/8 x 7/16 | 1 | Mylar |
| 306 | String Tag 15/16 x 1/2 | 1 | Mylar |
| 303 | String Tag 15/16 x 1/2 | 1 | Paper |
| 304 | String Tag 1 5/16 x 5/16 | 1 | Paper |
| 900 | Hang Tag 1 7/16 x 2 1/2 | 1 | Card |
| Avery 5160 | 2 5/8 x 1 | 3 x 10 = 30/sheet | Paper |
| Avery 5163 | 4 x 2 | 2 x 10 = 20/sheet | Paper |
| Avery 5167 | 1 3/4 x 1/2 | 4 x 20 = 80/sheet | Paper |
First Steps
To edit an existing layout, select “Labels” from the Main Menu.

Then, click on “Label Designer.”

Highlight the label form you want to copy.

Press Alt-F3 to copy. Click “Edit Form.”

Select “Report” and “Summary.”

In order to save the form, you must give it a new name. Edit the “Report Name” and “Report Title” as you see fit. They must be different than the form you are copying.
Click “OK.”

Label Designer Tabs
At the top of the label designer are different tabs to choose from. These tabs contain dropdown fields that allow you to modify or adjust the label.
File

You can exit the form by selecting “close” instead of clicking on the “X” button, if you wish. You can also exit by using the Ctrl and minus key on your keyboard.
Edit

Most of these fields are self-explanatory. For example, “Undo” will remove the previous change you made, while “Redo” will restore that change.
- Delete Selected Fields
This is handy if you need to delete more than one field. Hold shift on the keyboard and click with your mouse to select more than one field to delete.
- Delete Group
This option will only be accessible if the field selected is classified as a “group” field.
- Delete Section
This option will only be accessible if the field selected is classified as a “section” field.
If you have multiple fields selected that you want to remove, select “Delete Selected Fields.”
Insert
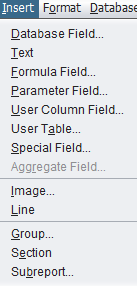
This tab lets you add fields to the label, from text, to columns, to images, and more. We’ll go over how this tab functions in detail later.
Format
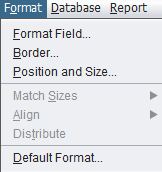
This tab includes additional ways you can edit a field.

- Format Field
Adjust the text’s font, size, and other characteristics, such as bold, italic, and underline.
- “Word Wrap”
Checking this field off means the text will move down to the next line once it reaches the edge of the text box.
- “Comma Wrap“
Checking this field off means that any time a comma is used in the text box, the text after that will go to the next line.
- “Grow Vertically to Fit Content
Automatically adjusts the text box to expand downward as necessary.
Information on “Format” and “Translate Names” will be included in this article soon.
Bar Code Format
- Bar Code Type
We recommend leaving this section alone unless instructed by our tech support team.
Align
The alignment causes the text or barcode to be flush left, right, or center within the field itself.
Color
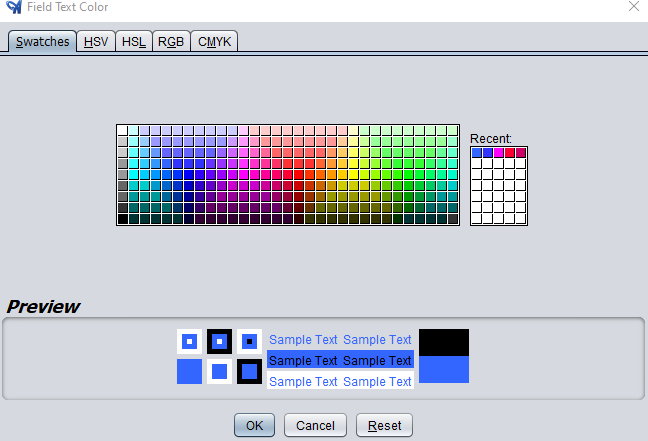
You may pick a swatch with the color dropper tool to update the text’s color. Or, you may use the other tabs for more control over mixing hues.

Inversing colors will switch the foreground colors to the background, and vice versa. Be mindful of your printer’s color capabilities and the color paper you’re printing on.
Border
This tab contains all parameters for a field’s border. A “count” set to “none” will not show a border line. You may have up to three lines on each side in a solid, dot, or dash style.
Examples:


Database
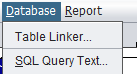
The database tab contains the “Table Linker.” The table linker connects report fields to Artisan code, which affects what appears on the label. We recommend leaving this section alone unless instructed by technical support.

This tab also includes “SQL Query.” This is particularly helpful when identifying any problems within the report. The staff might ask to see this information when repairing a report, which you can copy and paste into a support ticket.
Report: The first few tabs contain shortcuts to run or view the label, export or save a copy on your computer, or send it over email. The other sections contain options to sort, select, and view additional label information.
Editing the Form
From the Label Designer screen, you can edit existing fields or insert new ones. To edit an existing field, select the field you want to change. Notice that the border turns turquoise.

You can nudge the placement of the field by using the arrow keys on your keyboard. Or, right-click over the field and select “Format” to change its position. We’ll go over this in more detail soon.

Edit: This screen contains script information for the selected field. We recommend not altering this screen without instructions from the support staff.
Rename: Enter a new Formula Name into this field if you wish to change it.
Hide: This screen allows you to hide a field if necessary. We recommend not altering this screen without instructions from the support staff.
Delete: Selecting this option will remove/erase the selected field.
Replace Field Source: Selecting this option will cause any field that is placed on the form (using the Insert option or Field Picker) to assume the position, size, border, and format of this field.

Format: This screen allows you to control the size of the field, among other attributes. Please keep in mind that not all fonts will be rendered on the printer as you might expect. We utilize the internal printer fonts and commands for each printer. Many fonts are not represented within each printer. It is best to keep the fonts simple, such as Times New Roman or Arial. Practice with the results and make adjustments accordingly.
Size: Use this field to make the text smaller or larger. Be mindful of the size of your label and the other fields on the form. Bold, italic, and underline change the appearance of the text accordingly.
Word Wrap: Checking this field off means the text will move down to the next line once it reaches the edge of the text box.
Comma Wrap: Checking this field off means that any time a comma is used in the text box, the text after that will go to the next line.
Grow (Vertically) to Fit Content: Automatically adjusts the text box to expand downward as necessary.
Information on “Format” and “Translate Names” will be included in this article soon.
Bar Code Format
Unless otherwise instructed, leave the barcode information as-is.
Border: This controls the settings for the border around the selected field.

Count: This corresponds to the number of borders around the field in a specific area (top, bottom, left, or right). “None” means there isn’t a border, while “one” creates a singular border, “two” creates a double border, and “three” adds a third border.

Style: Select one of these options to change the border’s appearance.
 Example of a dashed line.
Thickness: This numerical value controls how wide the border is. A thickness of 3.0 is bigger than 1.0, for example.
 Example of a thicker border.
Border Color: Select from one of the swatches to change the border’s color.
Position and Size: This allows you to enter the exact coordinates to place the field.

Align allows you to position multiple objects at once. Hold the Ctrl key and click on other fields to select them. Then, right-click over the object that is in the correct position and choose “Align.” Then, select an edge, such as “Rights.” The selected object will align the right edges with the field you right-clicked over.
In this example, we right-aligned the “Item” field with the “Item Price” field.


Use the Insert Menu to add a new field. A field can be a database field, a text field, a formula, or a special field with built-in functions.
Database Field
The most common need is to add an additional database field onto the label form. Find the field you want and left click on it to drag it to your label. For now, you should only choose a field from the Inventory Item table until you have obtained an advanced understanding of the database structure.
Choosing fields from additional tables such as the category table requires an SQL feature. If you don’t know what that means, don’t worry. We will be offering advanced label and report designing classes, articles, and videos soon. Please contact us for assistance.

When you are done and ready to test, click on the small right “X” to close the screen.

Since you are working from a copy, you can always repeat the above steps and start over if necessary.

From here, make sure you enter a non-zero value in the menu order so this label form will be available to you from the label form pull-down menu.

From the label menu, make sure you choose your new form!
If you don’t see your label here, make sure you have your label printer setup properly. You must have the label printer setup and selected as the printer specified for merchandise labels, etc.
From here, you can edit your form without having to copy it each time. Just double-click on it from the label forms list and then choose “Edit Form.”
Please call the Technical Support team if you need assistance.