In order to use Artisan POS, you’ll need to download and install a program called PostgreSQL, which holds the data for Artisan. Normally, a support technician from CerTek or your dealer will do this for you.
PostgreSQL only needs to be installed on one computer in your network, which we’ll call “the server” or “the main”. Often this will be your main “register” (sales computer). It doesn’t need to have a server operating system.
Head to postgresql.org and click on “Download.”

Click on your operating system (for this example, we’re using a Windows computer, so we’ll click on the Windows icon).

Click on “Download the installer.”

Navigate to the column in the table that has your operating system–in this example, it’s Windows x86-64. If you’re not sure how to find your operating system, click here.
We currently recommend PostgreSQL version 16. [Last updated Mar 3, 2025.]
NOTE: If you’ll be using Remote Operation, every site and remote laptop must use the same version of PostgreSQL.
The examples below all show version 15, but apply to other versions as well.
Click the download icon for the desired version number and operating system.

The PostgreSQL installer will start downloading.
A pop-up window will ask if you want the program to make changes to your computer. Select “yes.”
Click “Next” on the PostgreSQL Setup Wizard.

PostgreSQL already created an installation folder for you in your Program Files section, so in most cases, you won’t have to change where PostgreSQL will be installed on your computer. If you want to change where PostgreSQL will be installed, click on the folder button and select a new location.

Otherwise, click “Next.“

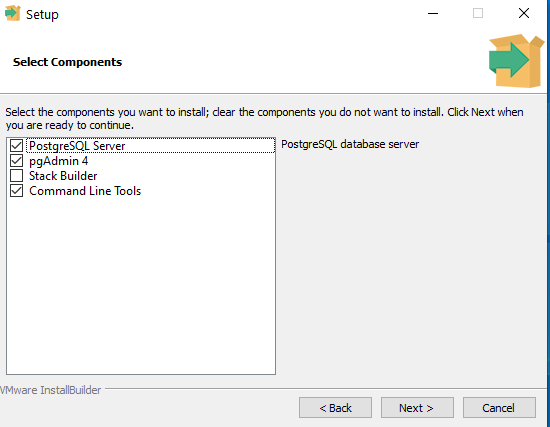
The installer will ask you to select the components to install. Select only PostgreSQL Server and Command Line Tools. Hit “Next.”
[TODO: Update picture to un-check pgAdmin.]
Now, you’ll need to select where your data will be stored. PostgreSQL will automatically create a data folder for you, but if you want to change where that data will be stored, click on the folder button. Otherwise, click “Next.”

Create a password to use to sign into PostgreSQL. Keep this password somewhere secure. Once you’re finished, click “Next.”

The installation wizard will automatically select what is known as a “port number.” The server “listens” to this port number. The default will be 5432, but change it to whatever port number you want to use. Our convention is to use port number = PostgreSQL version + 5420 (the “major” part of the version number only). Click “Next” when finished.

Leave the locale set to default, then click “Next.”

The installation wizard will show you a pre-installation summary. Click “Next.”

PostgreSQL is now ready to be installed. Click “Next.”

PostgreSQL will begin installing.

Once you have PostgreSQL installed, you will need to allow it to accept incoming connections through your firewall. On Windows, this will be in the settings for Windows Defender Firewall or whatever third-party firewall software you’re using.
There are a number of ways to get to the Allowed apps screen for Windows Defender Firewall. An easy way is to click in the Windows Search Box and type “Allow” as shown in the image.

Choose the program from your results list.

In the Allowed apps screen, if you don’t see PostgreSQL listed, click on Change Settings and then Allow another app…

Click on Browse and navigate to the C: Drive and then “Program Files”, “PostgreSQL”, the version number, and finally, “bin”. Scroll down and select the postgres.exe file and click on Open.

Click on Network types… and choose both public and private and then OK and then click Add.

If you are going to use Artisan from other computers, you must also configure PostgreSQL to allow incoming connections. Conveniently, we have just the file for most situations. You will need to click on this link and save the download file pg_hba.conf
Once you have this file in your downloads for example, then copy the file to this location:
C:\Program Files\PostgreSQL\16\data (or whichever version number you’re using). Make sure you put the file into the data folder and it should ask you to confirm the file replacement. Yes to replace the file.
NOTE: On macOS, you can’t just replace the file. Contact support for help updating pg_hba.conf on macOS.
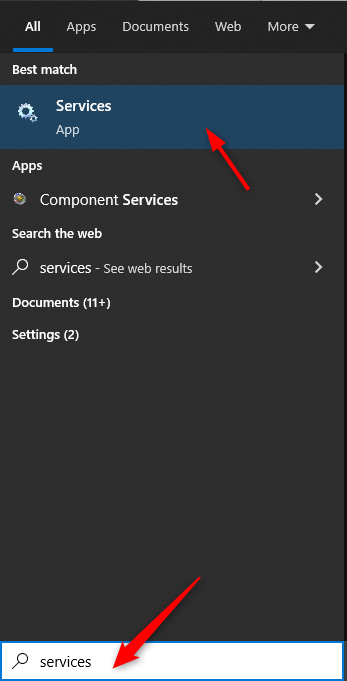
Next, on Windows, you’ll need to configure some more settings. Type “Services” into your Windows Search bar and click on the search result.
Scroll down to “PostgreSQL.”

Click on the Restart the service.
Now, Right-click and select “Properties.”

Click on the “Recovery” tab.

Make sure these first few fields are set to “Restart the Service” instead of “Take No Action.”
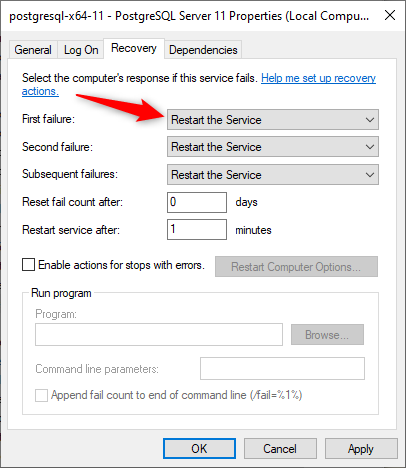
Click “Apply” and “OK.“