We’ve found a solution to the printer connectivity issues some users have faced since the Windows 10 and Windows 11 updates. Please read through the article or watch this video to learn more.
Solution
Utilizing a printer server might solve any connectivity issues that have arisen after updating your device to Windows 11.
1. Unbox the device.
2. Plug one end of the power adapter into the power jack on the back of the server. Connect the other end into a power source. A green light will display on the server.
3. Plug the printer server into your router or network switch.
4. Click on the printer server download link provided by our technical support team. (You’ll need to install your printer’s driver if you haven’t already. Otherwise, the installer will not recognize your printer).
5. Download the file and open it. Double-click on the “Setup.exe” file.

6. Select “Yes” on the “Do you want this app to make changes to your computer?” screen.

7. Click on “Networking Printer Wizard for Windows.”

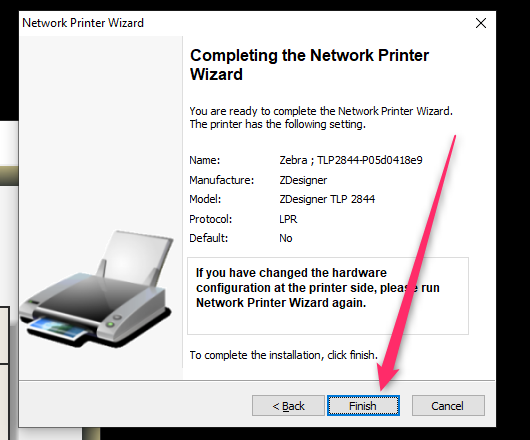
8. Click “Finish.”

9. Look for the “Launch Network” icon on your desktop. Double-click on it.

10. Click “Next” on the “Printer Wizard” welcome screen.

11. Select the printer from the list. In some cases, it might say “USB Device” instead of your printer. Click “Next.”

12. Locate your printer manufacturer and model from the list. Click “Next.” (You might select a different printer/model from this list depending on what printer you’re using).

13. Click “Finish.”
Note: Your printer needs to be on the same LAN (local area network) as the device.
In Artisan
Once you have the device plugged in and installed, it’s time to set it up in Artisan. Go to “Device Configuration” under “Program Options.” Look for “Printers” and select your next available printer spot. Name the printer.
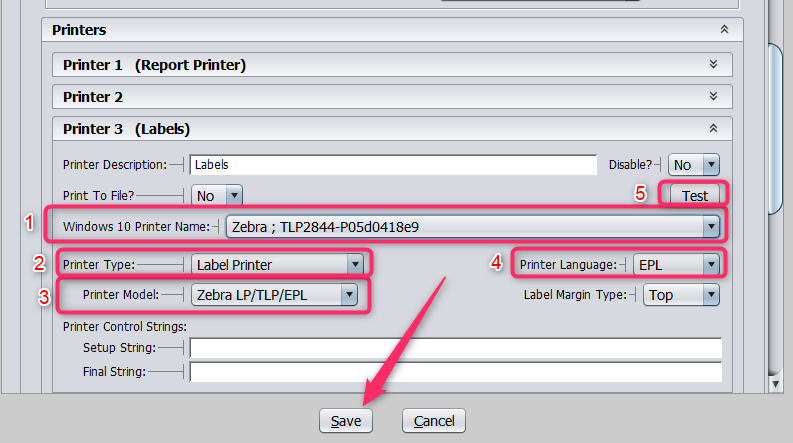
1. Select the printer under the “Printer Name” dropdown.
2. Set the “Printer Type” (e.g., label, thermal, sheet, ink jet).
3. Select the printer model that you’re wanting to connect to from the dropdown. In our example, it’s a Zebra label printer.
4. Your printer language should automatically change to the correct language for your printer.
5. It’s a good idea to conduct a test print once you’re finished. Press “Test” and wait for the print to initialize. This might take a few moments depending on your connection.
Press “Save.”